


Results 1 to 1 of 1
-
9th December 2016, 04:06 PM #1


 Charging your Nüvi and Other Garmin GPS Units on PC
There are three ways to charge most Garmin GPS units: in the car, through a standard wall outlet, or by computer. In addition to a car charger adapter, Garmin GPS accessories often include a USB cord to download maps and other data. Garmin USB cables will also usually charge automotive GPS units.
- Compatibility
Not sure how to charge a Garmin GPS on a PC or whether your unit allows for computer charging? The first thing you will need to charge your GPS through the PC is a USB cable.
The USB cable included with most Garmin GPS systems can be used to register your Garmin GPS unit and connect with services like Garmin Connect or myDashboard to download maps, update software, or find support. The best Garmin GPS units offer unlimited map downloads and updates when connected to a PC. Most automotive units also charge when connected to the computer's USB port. However, USB ports usually only provide an output of 5v DC and will charge your GPS more slowly than the traditional car charger or wall AC adapter.
Select units like the GPSMAP 620 and GPSMAP 640 Garmin GPS systems that offer marine navigational functions will not charge through a computer USB port. The pocket-sized Garmin Quest units are also unable to be charged on the computer, as they require a 12v connection.
- Connectivity
Your Garmin GPS unit should indicate that it is connected to your computer when plugged into a USB port. The location and size of the connector may vary between units, but it can generally be found along the side or back of the GPS. On some devices like the Garmin nüvi 2200, the connector for the computer USB cable is the same port as that used by the car charger. Others like the nüvi 2300 have two USB connectors, a micro-USB port, and a mini-USB port.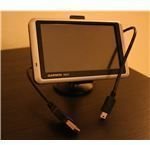 Each GPS will vary, so be sure to compare GPS features to see what tools, accessories, and add-ons are available for your system.
Garmin nüvi models and others will usually have an icon appear on the screen when connected to the computer by USB cable, showing an illustration depicting a connected computer and device. This indicates that the device is in USB mass storage mode. Because there are no obvious signs that the unit is charging, many users will now wonder if their GPS is actually charging.
To prevent the GPS from automatically entering USB storage mode and displaying the computer icon on its screen, users can "eject" the nüvi device from their computer to allow it to charge while off. In most cases, however, the GPS should charge automatically whether on or off.
There are a few simple steps to follow to ensure that your GPS charges when plugged into your computer USB port. The following directions are specific to the Garmin nüvi 250 model, but should apply to similar units. This guide will walk you through the basics of how to charge a Garmin GPS on a PC:
- Turn off your Garmin GPS and plug the device into your computer with your USB cable. Your computer should automatically detect the GPS.
- Open your "Computer" folder to view your drives and devices with removable storage. The Garmin logo GPS icon should appear here.
- Hold the power switch to the "on" position on your GPS. On your computer, right-click on the GPS icon and select "Eject" to remove the device. On a Mac, the Garmin icon can be dragged to the trash can. The computer image on your GPS screen should now disappear.
- Let go of the power switch and the GPS unit will indicate that it is switching to battery power supply.
- Confirmation
On some Garmin units, you can also touch the battery meter icon and hold for about 5 seconds to enter battery test mode. After connecting the USB cable, the device should indicate that it is charging on the main screen, reassuring you that the unit is indeed charging.
Users can test the unit to see if it has charged by turning it back on and checking the battery status indicator. However, it is important to note that charging times can be substantially longer when charging on a PC, especially if the unit is on and being used while plugged in. Charging times in the car can vary anywhere from 1 to 4 hours, depending on the unit and condition of the battery. On the computer, some Garmin units may take up to 8 hours to charge. A Garmin GPS can also take longer to charge before the device is first used. Even so, it is best to avoid overcharging your GPS for extended periods to prolong the life of the battery, as recommended for most electronic devices.
journeyx Reviewed by journeyx on . Charging your Nüvi and Other Garmin GPS Units on PC There are three ways to charge most Garmin GPS units: in the car, through a standard wall outlet, or by computer. In addition to a car charger adapter, Garmin GPS accessories often include a USB cord to download maps and other data. Garmin USB cables will also usually charge automotive GPS units. Compatibility Not sure how to charge a Garmin GPS on a PC or whether your unit allows for computer charging? The first thing you will need to charge your GPS through the PC is a Rating: 5
- Compatibility


 Register To Reply
Advertisements

Suggested Articles:


 Staff Online
iGO Primo NextGen 9.19.2.543580
linkler çökmüş. Yenileyebilirmisiniz In ENGISH...